We will learn different PowerShell Commands can be used in Incident Response to remediate the machine. I will take a real world scenario where a machine is infected with malware e.g. NanoCore RAT to explain this PowerShell Commands.
These commands can be very useful in a limited Windows environment where you don’t have access to tools like GNU core utilities, Python interpreters etc. If PowerShell remoting [2] is configured in your environment then you run these commands even on a remote infected machine from your clean machine.
CONTENTS
Overview of PowerShell
From Microsoft[1] – “PowerShell is a task-based command-line shell and scripting language built on .NET. PowerShell helps system administrators and power-users rapidly automate tasks that manage operating systems (Linux, macOS, and Windows) and processes”.
PowerShell is based on object not text. The output of a command is an object. You can send the output object, through the pipeline, to another command as its input. This pipeline provides a familiar interface for people experienced with other shells. PowerShell extends this concept by sending objects rather than text. These are two types of PowerShell:
- PowerShell or PowerShell Core – This is the current/latest version and built on .NET core framework. It’s open-source and run on Windows, Linux, macOS and ARM. The latest version is PowerShell 7 and main focus is making it a viable replacement for Windows PowerShell 5.1. This version needs to be manually installed from Github releases pages[3].
- Windows PowerShell – This is a legacy version and built on the .NET Framework and only worked on Windows systems. This is default installed on Windows systems and the latest version is 5.1.
How to execute PowerShell?
- Local Machine- Simplest way is to launch PowerShell via the start menu, select Windows PowerShell or PowerShell 7.
- Remote Machine – Configure PowerShell remoting [2] in your environment then you run commands on the remote machine as shown below.
Malware infection scenario – NanoCore
Suppose there is a NanoCore malware infection in our environment and we are at the eradication step of Incident Response. We will learn which PowerShell Commands can be used for Incident Response but it can be applicable to any malware family . To keep it simple, we will consider following points:
- Only one Windows 10 machine is infected with NanoCore malware in our environment based on Network logs.
- We have physical access to this machine so no need for PowerShell Remoting.
- We have the copy of the initial NanoCore sample 0ed2be7c91efdb87c98084bb0a22d8d7 [4] which infected the machine, so we know the IoCs.
NanoCore IoCs
- Drop RAVBg64.exe and bat files in $Env:TEMP
- Create run.dat and other files in the GUID directory in $Env:APPDATA.
- Create Persistency by creating autorun entry in HKEY_CURRENT_USER\Software\Microsoft\Windows\CurrentVersion\Run
- CC: anunankis3[.]duckdns[.]org
PowerShell Commands for Incident Response
The main goal of this Eradication step in Incident response is to remove all the malware artifacts from the system and verify if the system is completely cleaned or not.
One of the good things about PowerShell Commands is you don’t need to use different tools for working with files, registry or processes, all the things you can manage using inbuilt PowerShell cmdlets. All the PowerShell commands are tested on PowerShell 7 (or Core) but should work on Windows PowerShell 5.1.
Steps for removing NanoCore infection:
-
Check for malicious process
-
Terminate malicious process
-
Remove the persistency
-
Check for files in $env:APPDATA\GUID\
-
Get the Hashes of the files
-
Copy artifacts for analysis
-
Delete malware artifacts
1. Check for malicious process
We have to check if the malicious process RAVBg64.exe is currently executing from $env:TEMP directory or not. Get-Process cmdlet can be used to get currently executing processes as shown in the pic below.
Get-Process
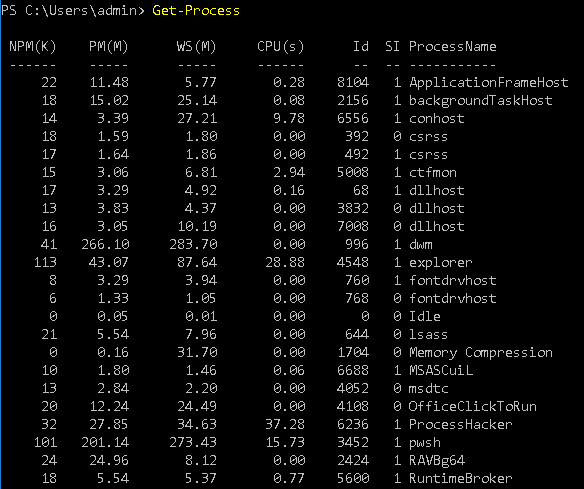
We know this RAVBg64 .exe process is executing as shown in the above image but we need to know the complete path to identify if it’s running from the temp directory.
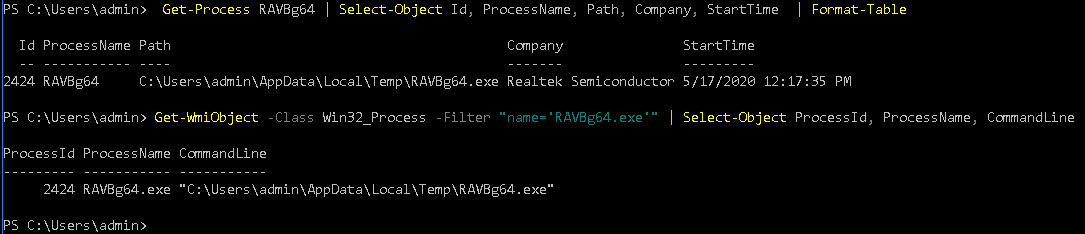
Get-Process RAVBg64 | Select-Object Id, ProcessName, Path, Company, StartTime | Format-Table
Get-Process cmdlet doesn’t support the process command line so use Get-WmiObject command
Only applicable for Windows PowerShell 5.1
Get-WmiObject -Class Win32_Process -Filter "name='RAVBg64.exe'" | Select-Object ProcessId, ProcessName, CommandLine
But Get-Wmiobject is deprecated so use Get-CimInstance for PowerShell 7 as mentioned by reddit user.
Get-CimInstance -Class Win32_Process | Format-Table -Property ProcessId, ProcessName, CommandLine -Autosize
2. Terminate malicious process
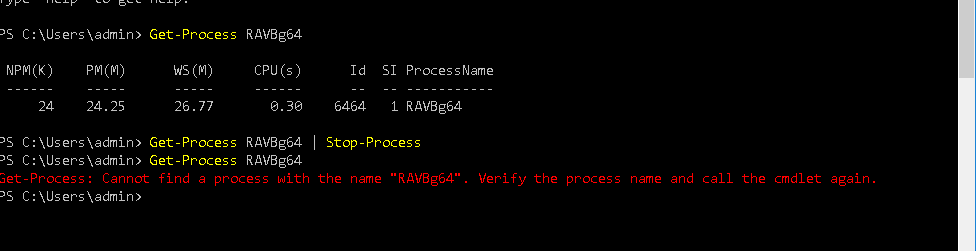
Stop-Process can be used to terminate processes based on process name or process ID (PID), or pass a process object.
Get-Process RAVBg64 | Stop-Process
You may need to stop this process imapsv.exe instead of RAVBg64.exe, if the machine has already restarted as this filename is used in registry for persistence.
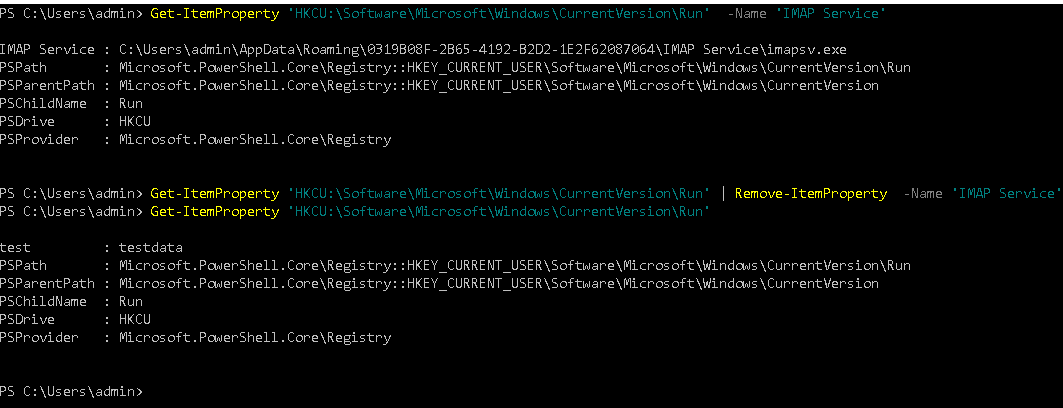
3. Remove Persistence
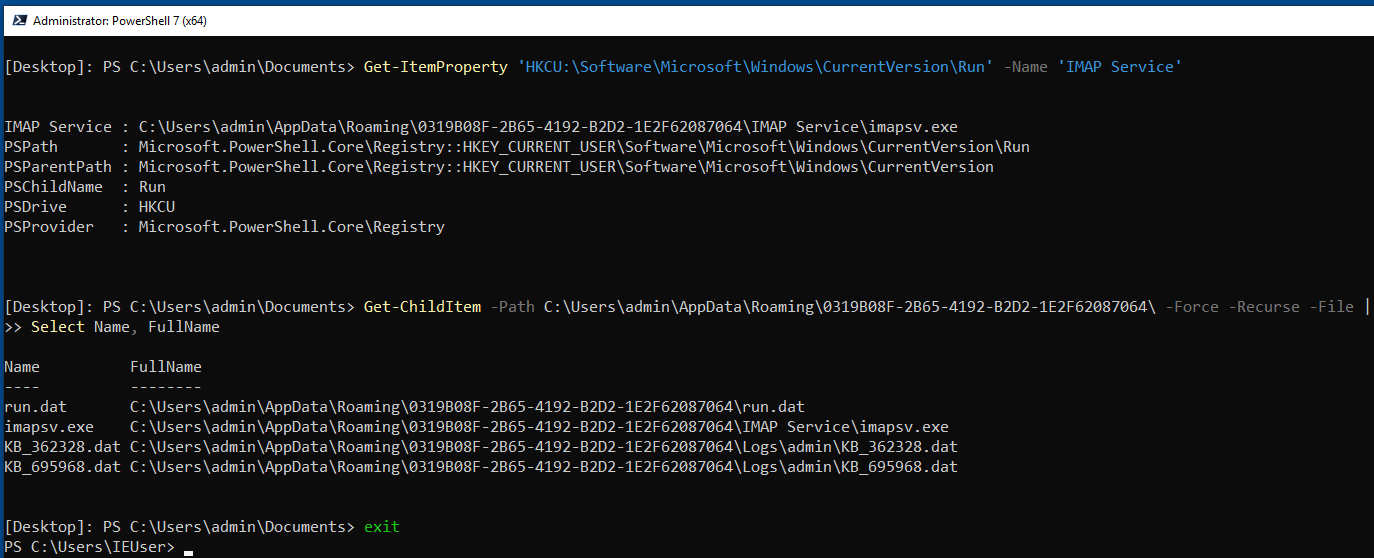
Get-ItemProperty cmdlet can be used for listing registry entries as shown below:
Get-ItemProperty 'HKCU:\Software\Microsoft\Windows\CurrentVersion\Run' -Name 'IMAP Service'
Remove-ItemProperty can be used for removing NanoCore persistence registry entry
Get-ItemProperty 'HKCU:\Software\Microsoft\Windows\CurrentVersion\Run' | Remove-ItemProperty -Name 'IMAP Service' Get-ItemProperty 'HKCU:\Software\Microsoft\Windows\CurrentVersion\Run'
4. Check for files in $env:APPDATA\GUID\
NanoCore creates a unique GUID dir in $env:APPDATA to keep it’s copy and logs. We can Get-ChildItem cmdlet to list the directory it’s like dir cmd. This cmdlet can be used in file system directory, registry hive, or a certificate store.
-Recurse – Used to recursive list all the sub-dir
-Filter – You can use the parameter to filter the path and it supports * and ? wildcards e.g *.dat, *.exe
Get-ChildItem -Path $Env:APPDATA -Force -Recurse -Filter run.dat
Instead of Get-ChildItem, we can Test-Path to check if the dir or file exists or not
Test-Path -Path $Env:APPDATA\*\run.dat
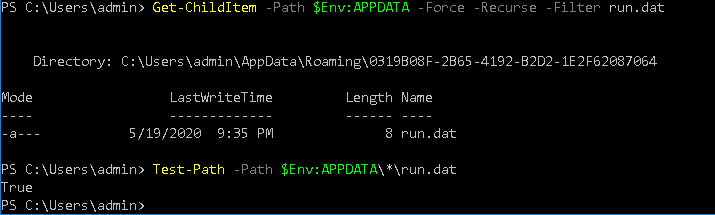
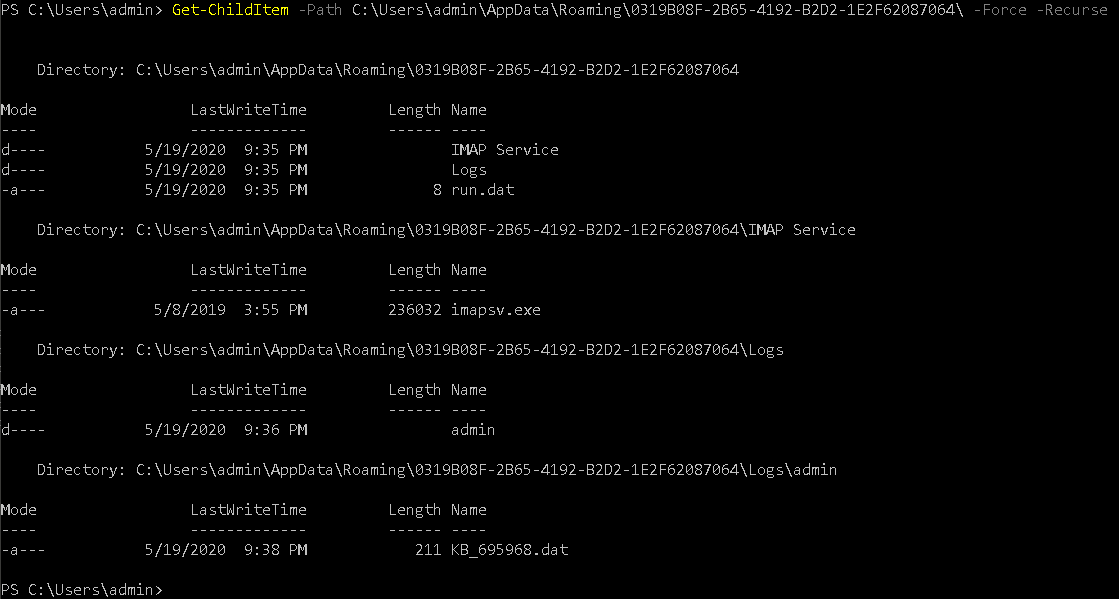
After running the above cmds you will be able to know the unique GUID directory name 0319B08F-2B65-4192-B2D2-1E2F62087064 , this folder contain other artifacts as shown in below screenshot
Get-ChildItem -Path C:\Users\admin\AppData\Roaming\0319B08F-2B65-4192-B2D2-1E2F62087064\ -Force -Recurse
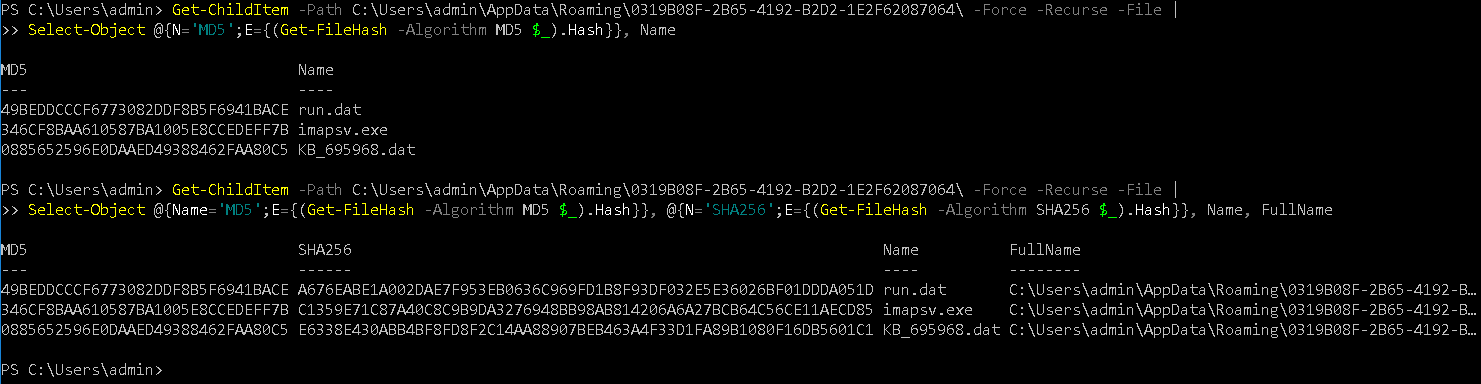
5. Gather hashes
Get-FileHash cmdlet can be used to get the hash using a different algorithm e.g. MD5. SHA1 , SHA256 etc. By default, the Get-FileHash cmdlet uses the SHA256 algorithm, although any hash algorithm that is supported by the target operating system can be used.
SHA256
Get-FileHash -Path 'C:\Users\admin\AppData\Roaming\0319B08F-2B65-4192-B2D2-1E2F62087064\IMAP Service\imapsv.exe'
MD5
Get-FileHash -Algorithm MD5 -Path 'C:\Users\admin\AppData\Roaming\0319B08F-2B65-4192-B2D2-1E2F62087064\IMAP Service\imapsv.exe'

We can use Get-ChildItem & Get-FileHash cmdlets for collecting the file hashes in the directory with MD5, SHA256, Name & FullName.
We will use calculated properties that require a Hashtable with a Name/label and an Expression key. The name key is the property name and the Expression key is a scriptblock that will be executed as Select-Object receives input. Please read this great article [5] by @adbertram regarding calculated properties using Hashtable
@{ Name = ''; Expression = {}}
Using E/Expression we are calculating the MD5 & SHA256 of each file returned by Get-ChildItem
Get-ChildItem -Path C:\Users\admin\AppData\Roaming\0319B08F-2B65-4192-B2D2-1E2F62087064\ -Force -Recurse -File | Select-Object @{Name='MD5';E={(Get-FileHash -Algorithm MD5 $_).Hash}}, @{N='SHA256';E={(Get-FileHash -Algorithm SHA256 $_).Hash}}, Name, FullName
Now we will export the result in FileHashes.csv format using Export-Csv
Get-ChildItem -Path C:\Users\admin\AppData\Roaming\0319B08F-2B65-4192-B2D2-1E2F62087064\ -Force -Recurse -File | Select-Object @{Name='MD5';E={(Get-FileHash -Algorithm MD5 $_).Hash}}, @{N='SHA256';E={(Get-FileHash -Algorithm SHA256 $_).Hash}},Name, FullName | Export-Csv -Path FileHashes.csv

5. Copy artifacts for analysis
Before removing the artifacts, we may want to copy them for further analysis if needed by other teams.
Let’s use the New-Item cmdlet to create the directory and use Copy-Item to copy the files to IoCs dir
New-Item -ItemType Directory -Path C:\Users\admin\IoCs
Copy-Item C:\Users\admin\AppData\Roaming\0319B08F-2B65-4192-B2D2-1E2F62087064\ -Destination C:\Users\admin\IoCs\ -Recurse

6. Delete malware artifacts
We have already removed the persistence mechanism, now we just need to delete the files from the infected machine using Remove-Item cmdlet.
Delete the complete dir recursively
Remove-Item -Path $env:APPDATA\0319B08F-2B65-4192-B2D2-1E2F62087064\ -Recurse -Force
Remove the copy of the NanoCore malware
Remove-Item -Path $env:TEMP\RAVBg64.exe -Force
Delete the initial file
Remove-Item -Path $env:USERPROFILE\Desktop\Serial.exe

Conclusion
In this article, I have explained useful PowerShell Commands which can be used in Incident Response for NanoCore but these commands can be applied to any malware infection. There are a lot more PowerShell Commands which can be used in Incident Response.
For the next iteration, you can even write the PowerShell script and deploy to multiple machines over your network for cleanup.
If you are looking for an easy way to deobfuscate PowerShell then check this Deobfuscate PowerShell using PowerShell Logging.
References
- PowerShell Overview – Microsoft
- PowerShell remoting
- Installing PowerShell Core
- ANY.RUN – (MD5: 0ed2be7c91efdb87c98084bb0a22d8d7) NanoCore
- Using PowerShell’s Calculated Properties
2 Comments. Leave new
[…] submitted by /u/securityinbits [link] [comments]Post […]
[…] by /u/securityinbits [link] […]